みむらです。
先日 SECCON CTF が行われ、司会業しながら問題もひとつ出題させて頂きました。
当日朝来たら「問題名は mimura ね!」となっていました。
みなさんがもしかしたら持たれていたかもしれない、
「なんだよ、自己主張強すぎだろ・・」みたいな認識は誤りです。。(苦笑)
当人も年末に心臓にリアップ(育毛剤)を掛けられた感じで、
それはそれはよい毛が生えた気がします。冗談はこの辺にして。。
Hi, This is Mimura is author of “Mimura” challenge had provided on SECCON 2019 final.
I would have named to my challenge if I knew it will called as my name.
but in fact, I got a strong heart in exchange for the result.
okay, enough with jokes. I’ll start explaing how to solve it:
問題のストーリー / Overview:
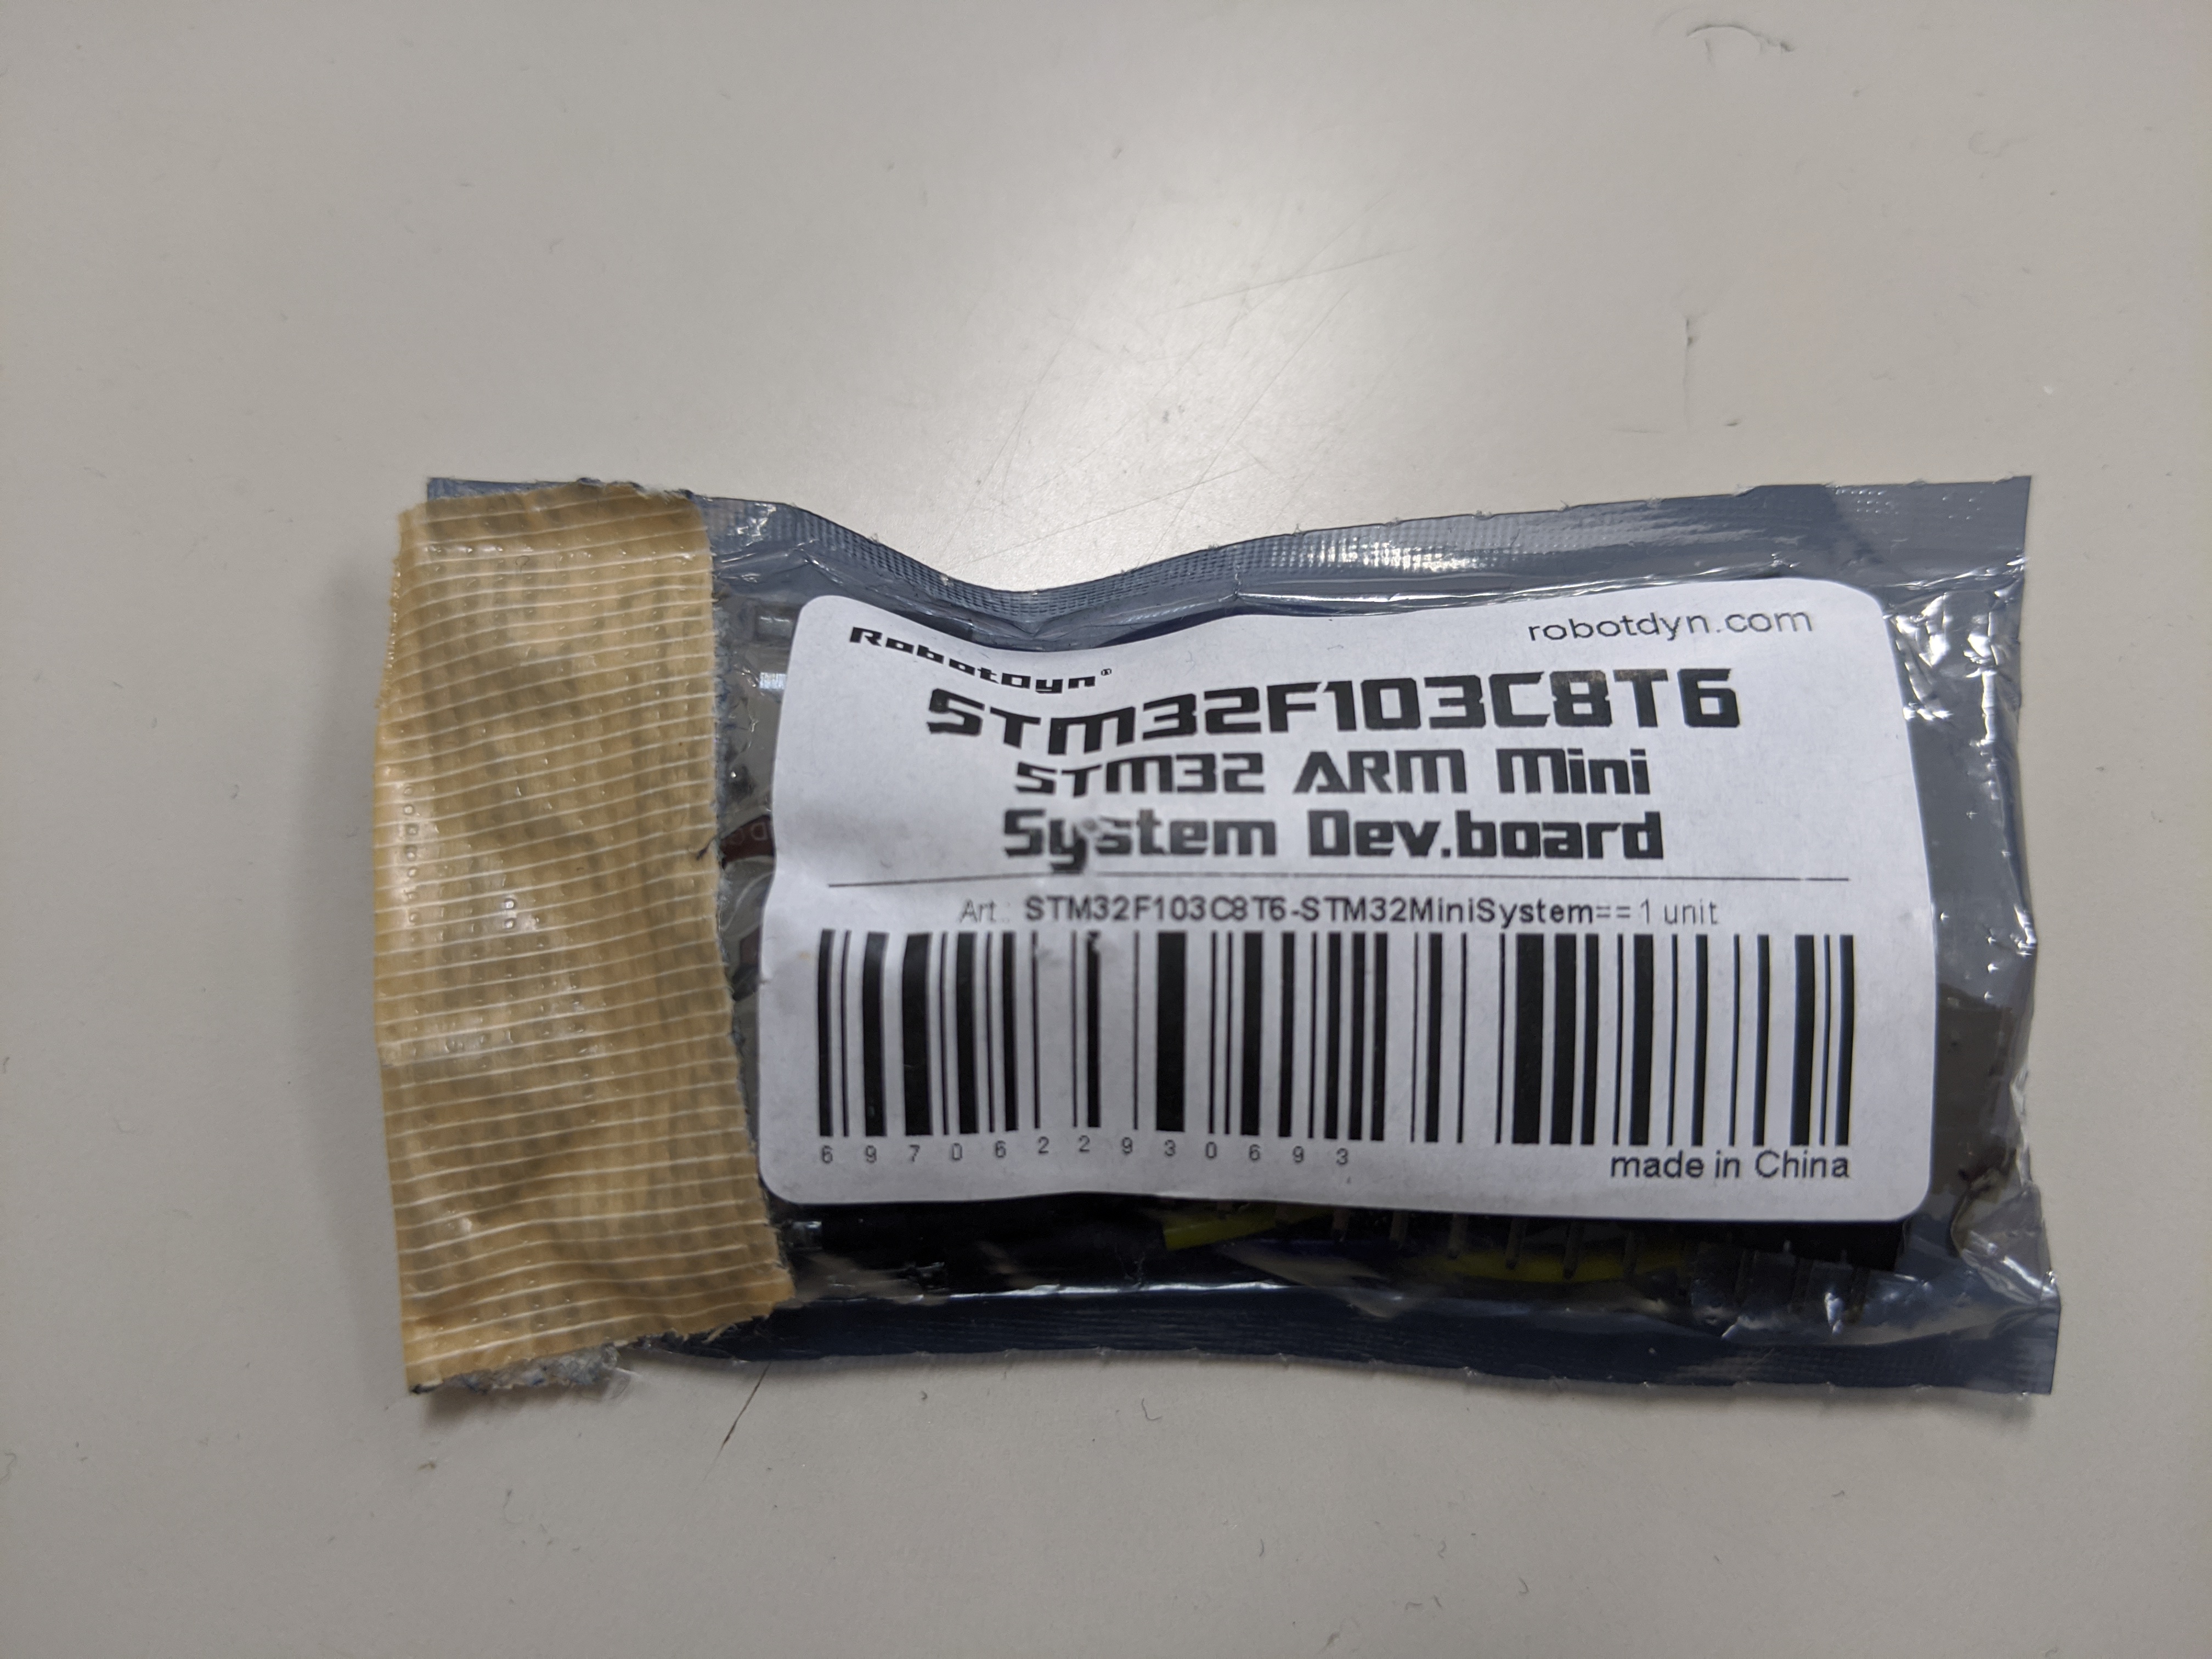
パスワードロックされている USB ドングルが渡されるので
上手くパスワードロックを解除して中からフラグ文字列を探すことが目的です。
そのための手としては下記のようなものが考えられます。 (解くために必要な訳ではないです):
・USB ケーブルを接続する
・デバッガに接続する。
・ファームウェアを取り出して解析する。
・改造して書き戻す
・半田ごてで回路を変更する etc…
We provide a usb-key which seems protected by password.
you should find a password and find a flag on this device.
You can.. ( of course, you don’t have to do everything.) :
・Connect to Debugger (Hardware Emulator)
・Connect to PC
・Dumping and Analyse a firmware.
・Rewrite a modified firmware.
・Modify the circuit with soldering iron etc..
どうしてこういう問題を作ろうと思ったか。 / What influenced:
ハードウェアに関する問題を作ろうと思っていて、
ハードウェアロック付きの USB メモリを問題にしたら面白そうと思ったのがきっかけです。
また最近は業務でもハードウェア機器を触ったり色々としていますので
自分の中で作問を通してちょっと無理(学習)をしてみようという気持ちで
マスストレージに挑戦してみようと思いました。
I was influenced by Security USB-Key.
My main job is security researcher and developer, and I have recently been investigating of hardware device.
So, I thought to try to make mass storage device without an OS and growth up my skills.
ステップ1:ハードウェアを繋ごう
Step1 : Let’s connect the device to your machine.
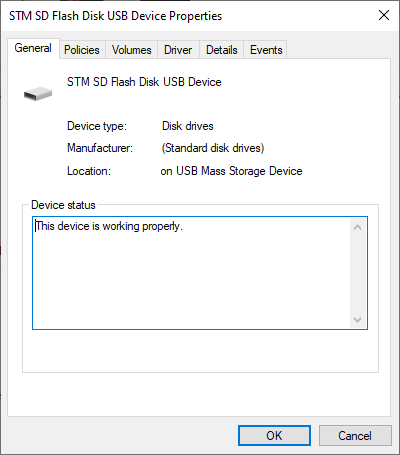
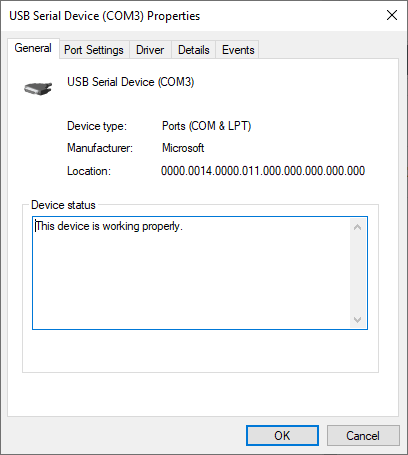
ハードウェアを繋ぐと上記のような2つのデバイスが認識されます。
You will find these devices on your machine when connect the device.
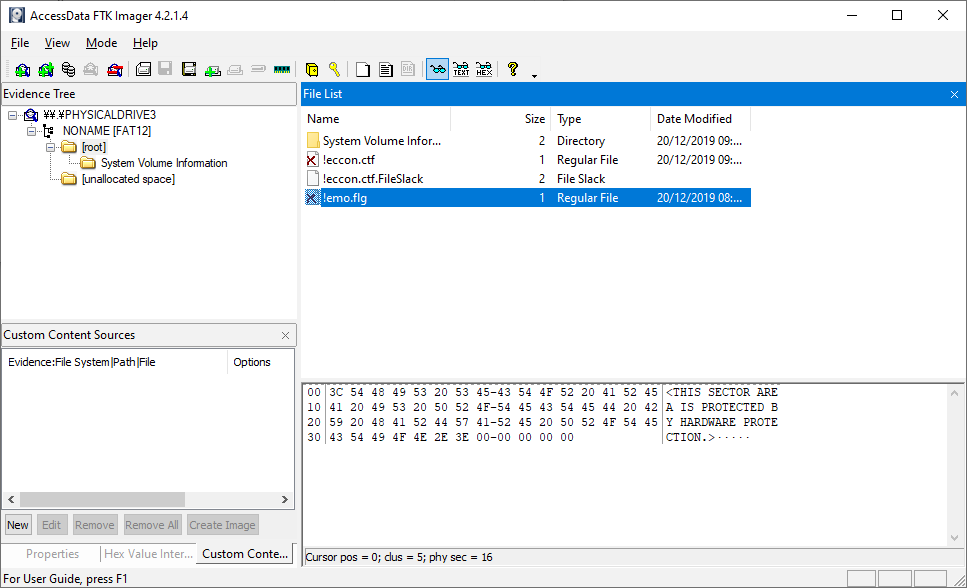
また、マスストレージの方は、それっぽいファイルが保存されているのですが、
“<THIS SECTOR AREA IS PROTECTED BY HARDWARE PROTECTION>” と表示されていて、
内容が読めません。
You can find deleted file that seems would contain a flag data, but it seems protected.
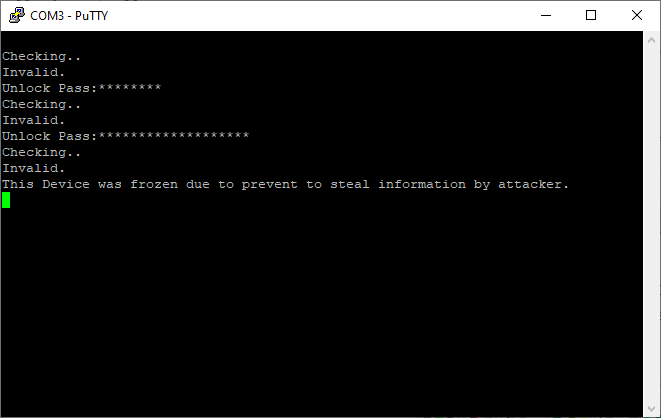
COMのほうはというと、繋ぐとパスワードを要求され、
3回失敗すると、パスワードの受付を一切してくれなくなります。
Let’s check the com port. It looks like we need to input correct password via COM port.
And if you input wrong password three times, the device going to freeze.
ステップ2:デバッガを繋ごう
Step2 : Let’s connect emulator (debugger) to device.
USBポートの真逆の位置に、SWD ポート(デバッガを接続するためのポート)が生えています。
ここに問題と一緒に配布していたケーブルを接続し、デバッガ (STLink) と接続します。
You can find a SWD port that uses for hardware debugging on the other side of USB port.
You need insert a cable which we provided at beginning of the game and connect to the emulator (STLink).
ただそのままでは接続できません。
世の中に売られているハードウェアにおいても、
こういうデバッグポートは何らかの手によって接続できないように作られています。
今回の問題では、本体のプログラムコードの冒頭で SWD ポートを無効にするように
コードを入れておきました。
But… you may can’t connect the device via emulator if just connect.
Most devices disable the debug port (such as SWD, JTAG ICE and so on..) to protect “Intellectual Property” or prevent from illegal use.
Also on this device, I insert a code to disable the SWD port at the beginning of the main program code.

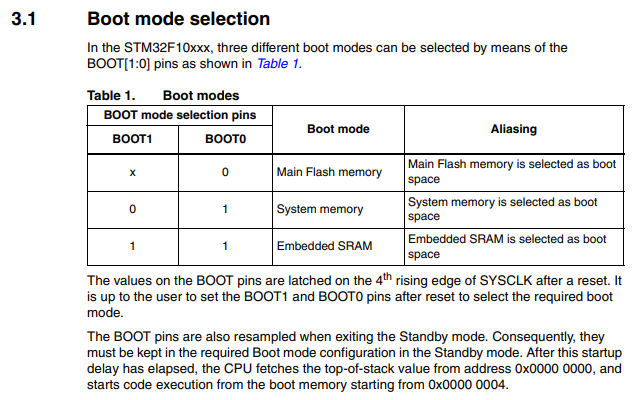
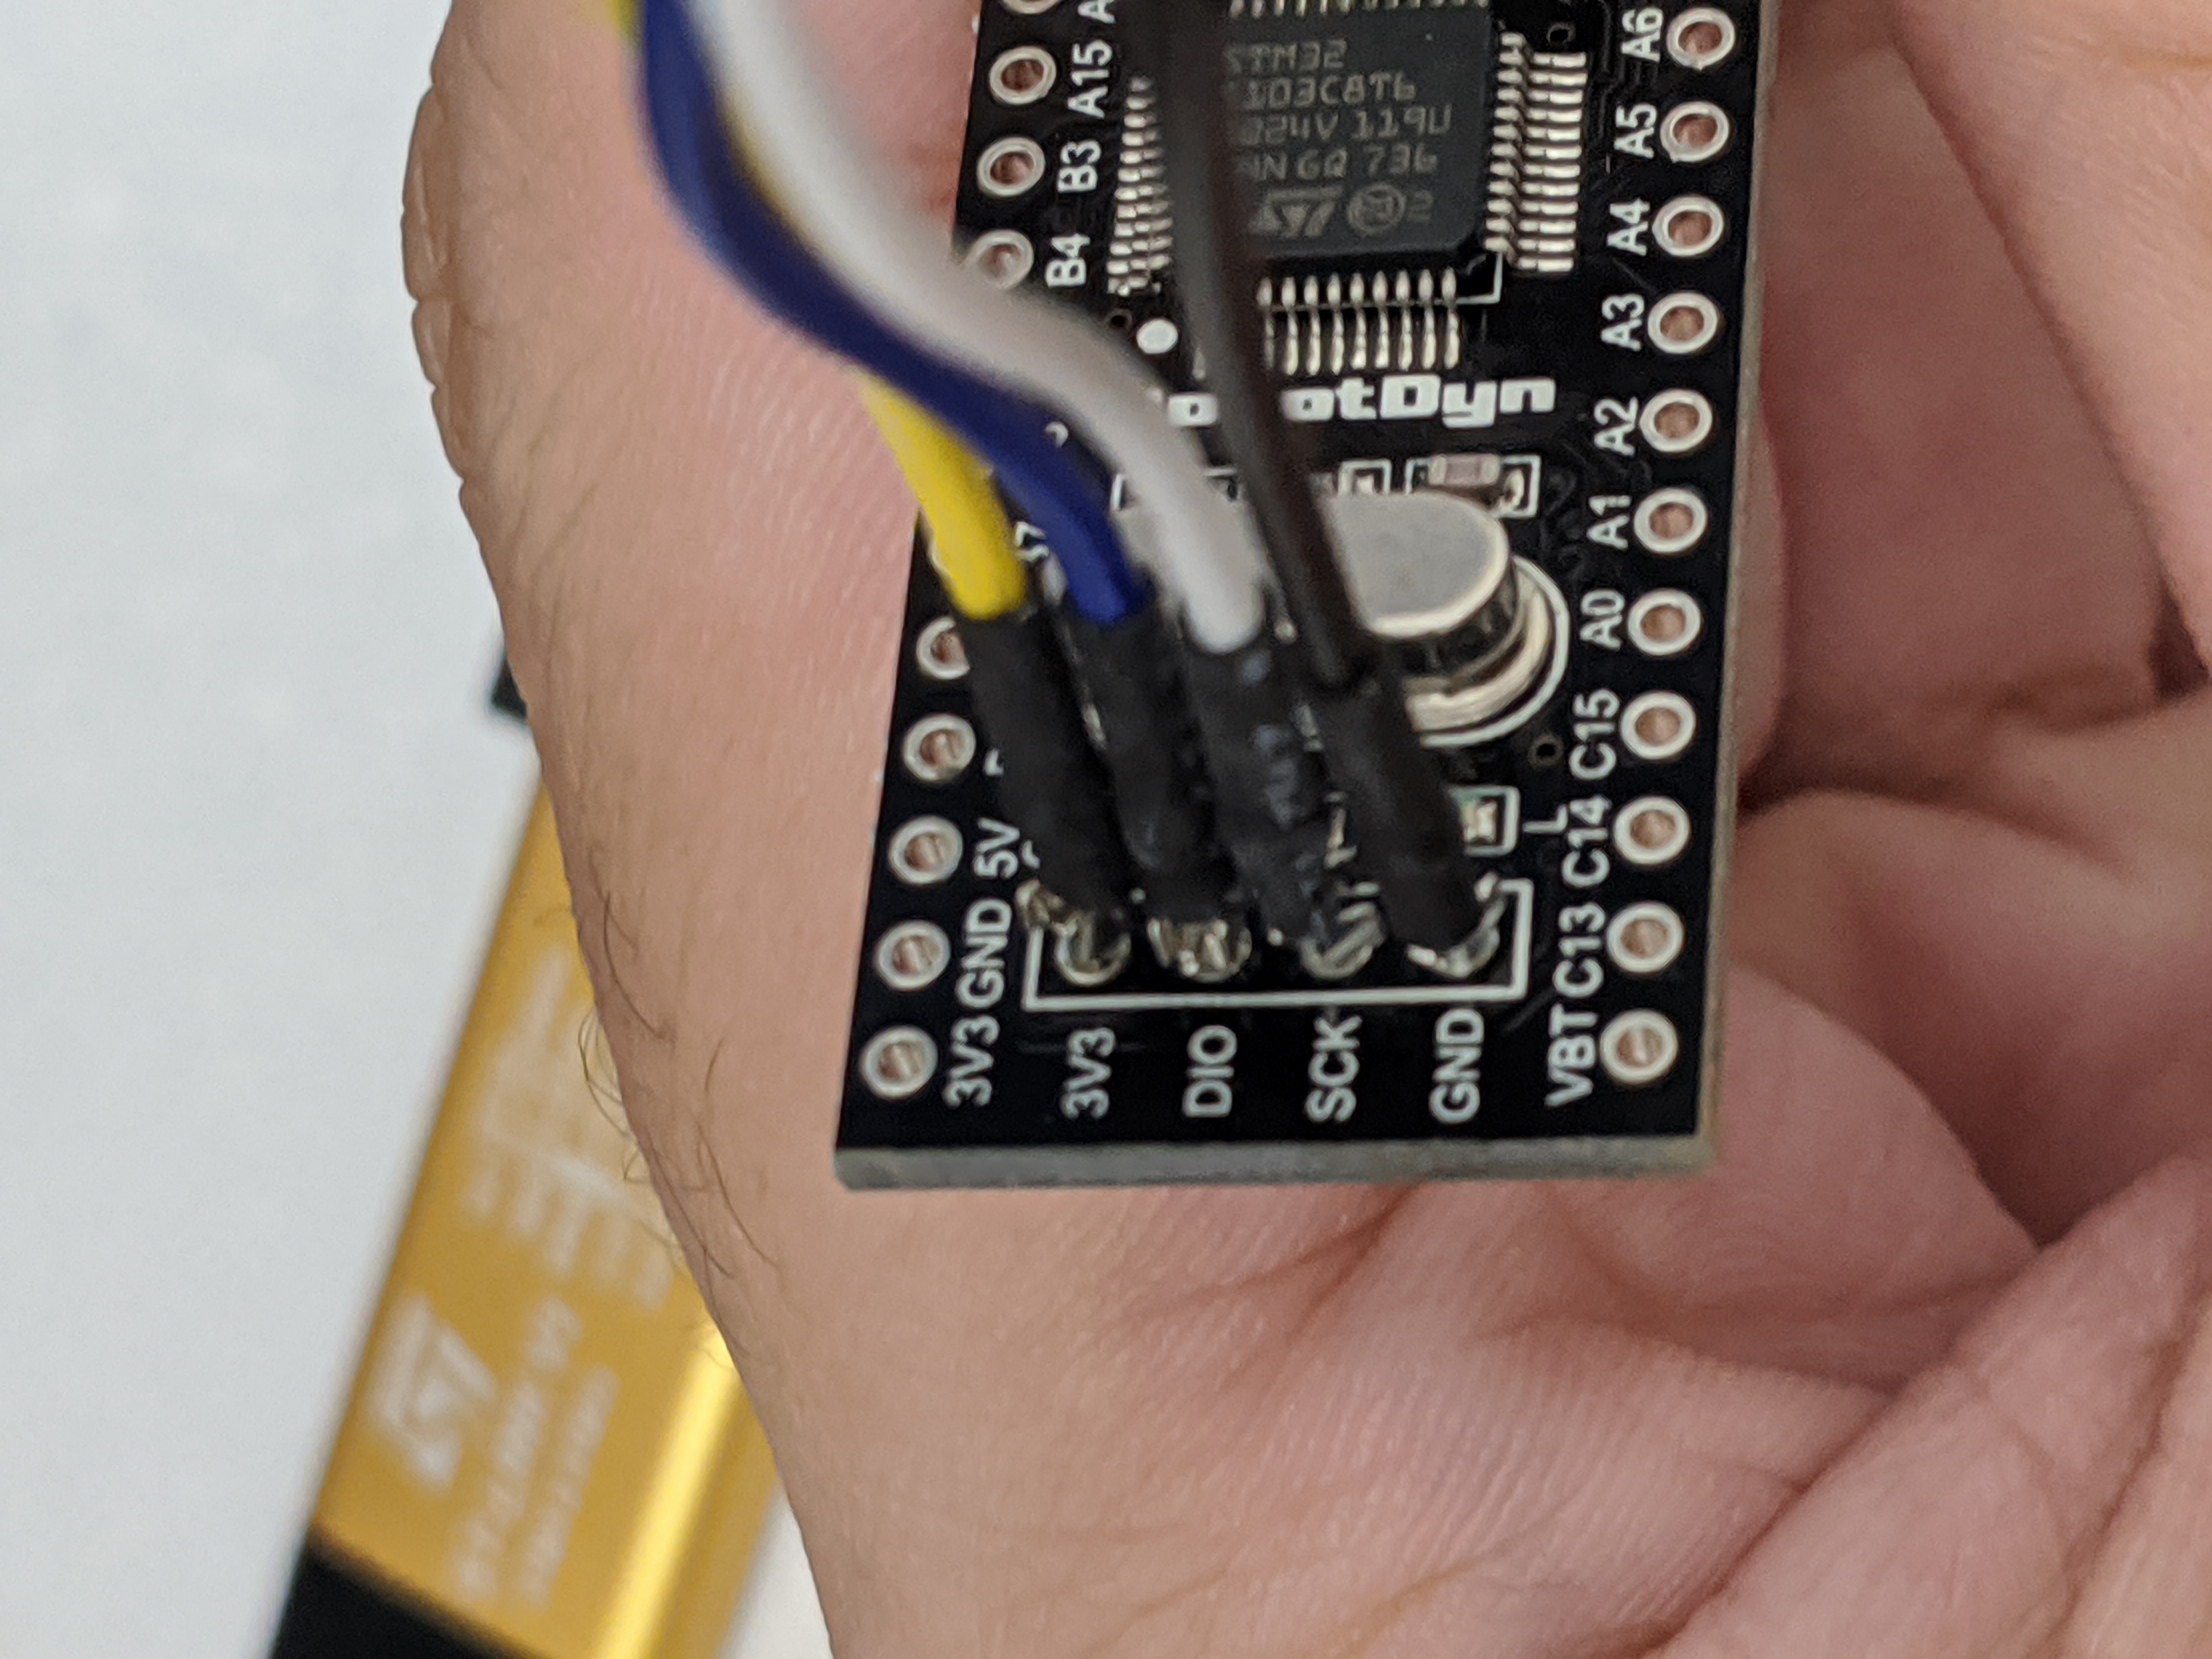
今回のボードですと、上にジャンパスイッチがありました。
ここをの上のピン (BOOT0) を “0” 以外にすることで、メインファーム(今回の問題のプログラム)以外でシステムが立ち上がるようになるため、
プログラムによって SWD の無効化が行われず、接続可能となりました。
その他の方法としては、上の “RST” と書かれたボタン(リセットボタン)を押し続け
プログラム自体が起動しない状態にして接続するという方法もあります。
You can control the boot mode by Jumper switch.
If you change the BOOT0 pins ( upper pin ) to 1 (such like the photo), you can connect SWD port because the hardware will not run the challenge binary.
In other way, you can connect it with push and hold the RST button until connect the emulator successfully.
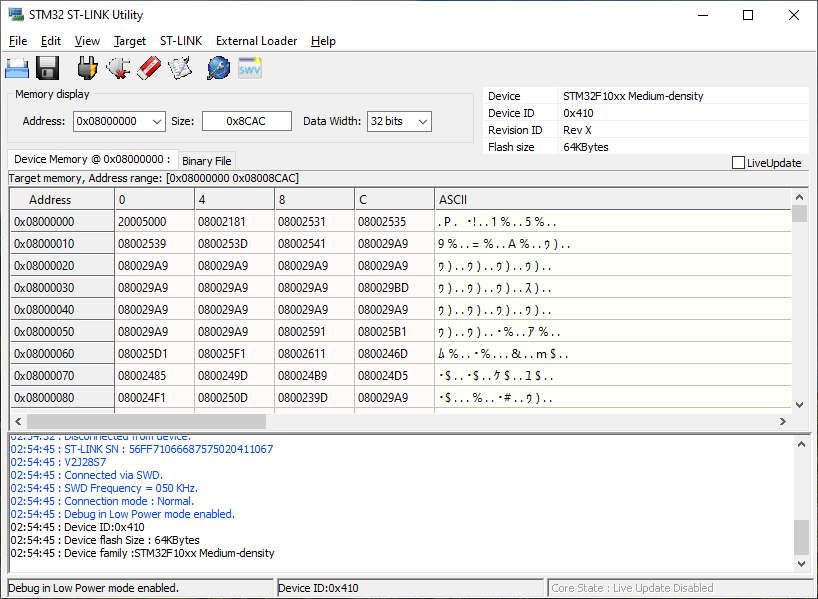

接続が無事に完了すれば、メモリをダンプするツールを用いて
フラッシュの内容を抜き出します。
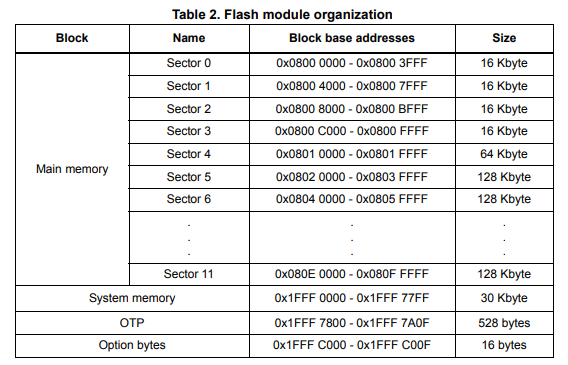
アドレスについては、同じようにチップの仕様書を見ると
“Flash memory” は 0x08000000 から 0x080FFFFF にアドレスが設定されていますので、
この範囲を見ながらダンプを行います。
今回の問題では 64K のメモリが積まれていましたので、
Sector 0 から Sector 3 (0x0800FFFF) までがアクセス可能になっているかと思います。
上記の例では STM32 ST-Link Utility を使用しましたが、
その他に使い慣れたプログラマやデバッガをお持ちであればそれを利用したりして
抽出すれば良いと思います。
例えばSTM32 を J-Link 化したあと OpenOCD で接続して、
mdw コマンドで “mdw 0x8000000” として取り出したり
dump_image コマンドで “dump_image dump.bin 0x8000000 0xFFFF” みたいな感じで
抽出するという方法などもあります。
After connection, you can rip the firmware from hardware with writer tool.
According to the peripheral data sheat, You can find that the main firmware saved on a memory of 0x08000000 (Sector 0) to 0x0800FFFF (Sector 3) area.
I used STM32 ST-Link Utility to rip the challenge program binary on this time.
It’s also possible to rip with OpenOCD or similar tools.
if you try to rip with OpenOCD, you can use “mdw” command (i.g. “mdw 0x8000000” ) or “dump_image” command (i.g. “dump_image dump.bin 0x8000000 0xFFFF”)
ステップ3:ファームウェアを解析しよう
Step 3 : Let’s analyse the firmware!
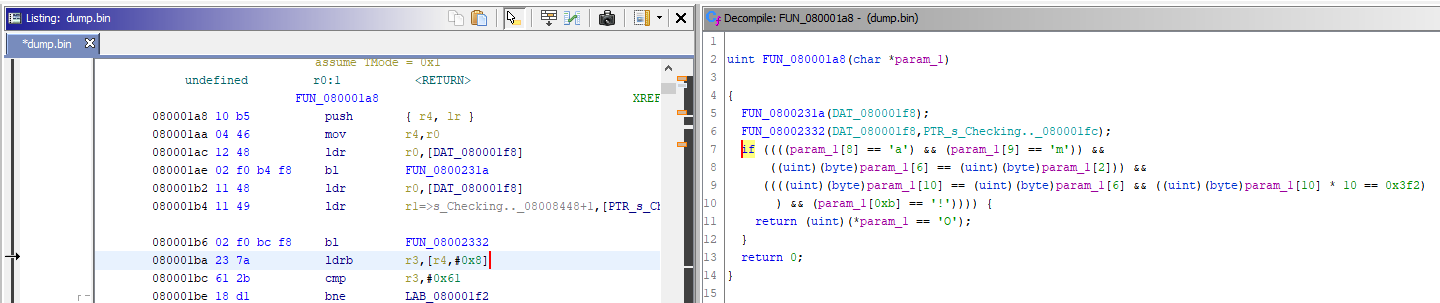
普段は IDA 使いなのですが、
無料の範囲でバッチリできることを確認するために、 Ghidra でやってみます。
パスワードを入力したあとに “Checking…” と出ますので
その文字列の処理を頼りに探してみると 0x80001a8 付近にパスワードの確認処理が見つかります。
ここの処理を見ると下記のルールが現れます:
・1文字目は “O”
・3文字目、7文字目、11文字目は “e”
・9文字目は “a”
・10文字目は “m”
つまり、不明な部分を適当な文字で埋めると “O_e___e_ame!” となります。
Let’s analyse the firmware with Ghidra!
Looking back at the communication via serial port, the string that “checking ..” was appeared after send a password.
At address 0x80001a8, you can find the code.
According the code, you’ll find these rules:
* 1st character is “O”
* 3rd, 7th and 11th character is “e”
* 9th character is “a”
* 10th character is “m”
Therefore, the password will “O_e___e_ame!”. ( I filled unknown character with “_”)
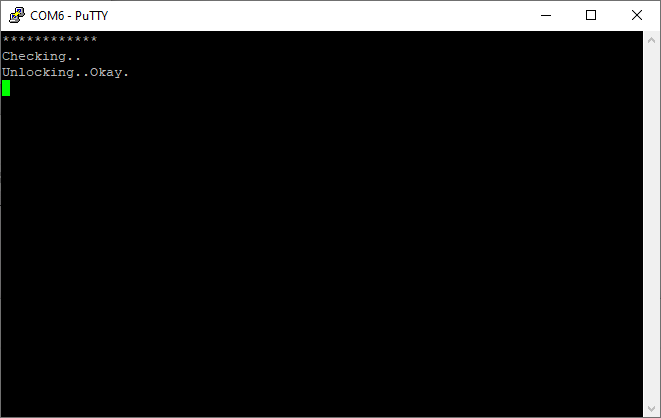
やった!解けました!
Hooray! you did it!!
実は… / It’s hard to say this, but…
・・・ですよね。。すみません。
これなのですが、書き込むリビジョンを間違えてしまいまして、
特定位置の文字列チェックが欠損した版になっていました。
ミスの状態のまま出題を行ってしまい申し訳ありませんんでした。。。
…yes, I know why you’re being wired. It’s a my fail. I’m so sorry.
I had made a mistake that I wrote an another version firmware.
Thus, you would not have found a 2nd, 4th, 5th, 6th and 8th character.
ここで回答を期待していたキーワードは “開け!ゴマ!” です。
アリババと40人の盗賊で登場する話ですが、日本だと「アラジン」とかそういう話でも出てくるので世界一般以上に日本で有名なキーワードなんじゃないかと思います。知りませんけど。。
My expected password is “Open Sesame!”.
This is one of the most famous words from “Alibaba and the Forty Thieves”, I think.
ステップ4:ファイルを取り出そう
Step 4 : Let’s extract the file.
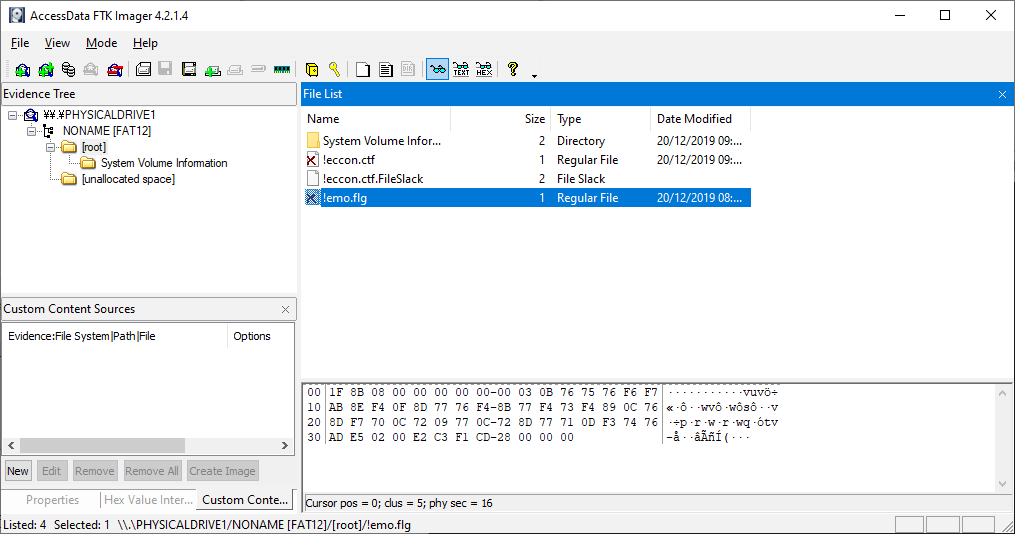
アンロックしてから読み直すと、フラグファイルが見えるようになります。
あとはこれを展開すると、フラグが出てきます。
SECCON{YOU_CAN_ANALYSE_HARDWARE_DEVICE}
After unlocked, let’s try to find a flag file on the storage with Forensics tool.
You can get a flag after by extracting it.
SECCON{YOU_CAN_ANALYSE_HARDWARE_DEVICE}
FAQ / よくある質問
Question:
試してみたいのですが、評価ボードはもらえますか?
Can you give me the challenge board?
Answer:
ごめんなさい。。でももしお会いできる機会があれば、事前にお持ちすることは可能です。
Sorry. I can’t. but I can show you the board. please feel free to contact me.
Question:
どうしてパスワードを解除したあとにファイルが表示されないのですか?
Why didn’t show the file after unlocked?
Answer:
Windows でテストをした際に、エクスプローラや通常の方法で読み出しに失敗することが何度か確認できており、当該のエラーの解決が間に合わなかったのが理由です。。すみません。。
I’m sorry again. I found a issue that windows system can’t read FAT12 data correctly, and I couldn’t find a solution before the CTF.
最後に / Summary and digression:
次出すことがあれば、もっとちゃんと自分が納得できる問題を提供したいなと思っており
今回の自分の問題は、ソフトウェアディベロッパとして、ユーザにソフトウェアを提供することのある人間としては、クオリティが低すぎたんじゃないかと自分でも猛省しています。
とはいえ、別件のこともありますし、Twitter で軽く触れたことは自分の意見には間違いないので
機会があれば十分な期間を取った上で、問題のクオリティや出し方(何をすれば良いのかを明瞭にする、問題タイトルをまともなモノにする)を自分の納得できるレベルにして出題してみたいですね。
問題を通してハードウェアに対してちょっとでも興味を向けてもらえる人が増えたなら
(ハードウェアから信頼を築いていく面白さとか、純粋に現実世界と仮想空間が繋がるのたのしい!とか思ってもらえたなら)今回出題して良かったなーと思います。
・・・司会業を当日していながら、色々と申し訳ない気持ちとかがあったのですが、
そういうのはチラ裏で。
I think I could have improved the quality of the challenge If I had more time.
Thus, I need to apologize to the CTF Player.
But fortunately, some CTF players told me the challenge was interesting.
It made me very happy.
so I think I want to create the “CTF challenge” ( the meaning that it meets the criteria for a general CTF challenge) in the hardware genre if next seccon ctf is to be held.
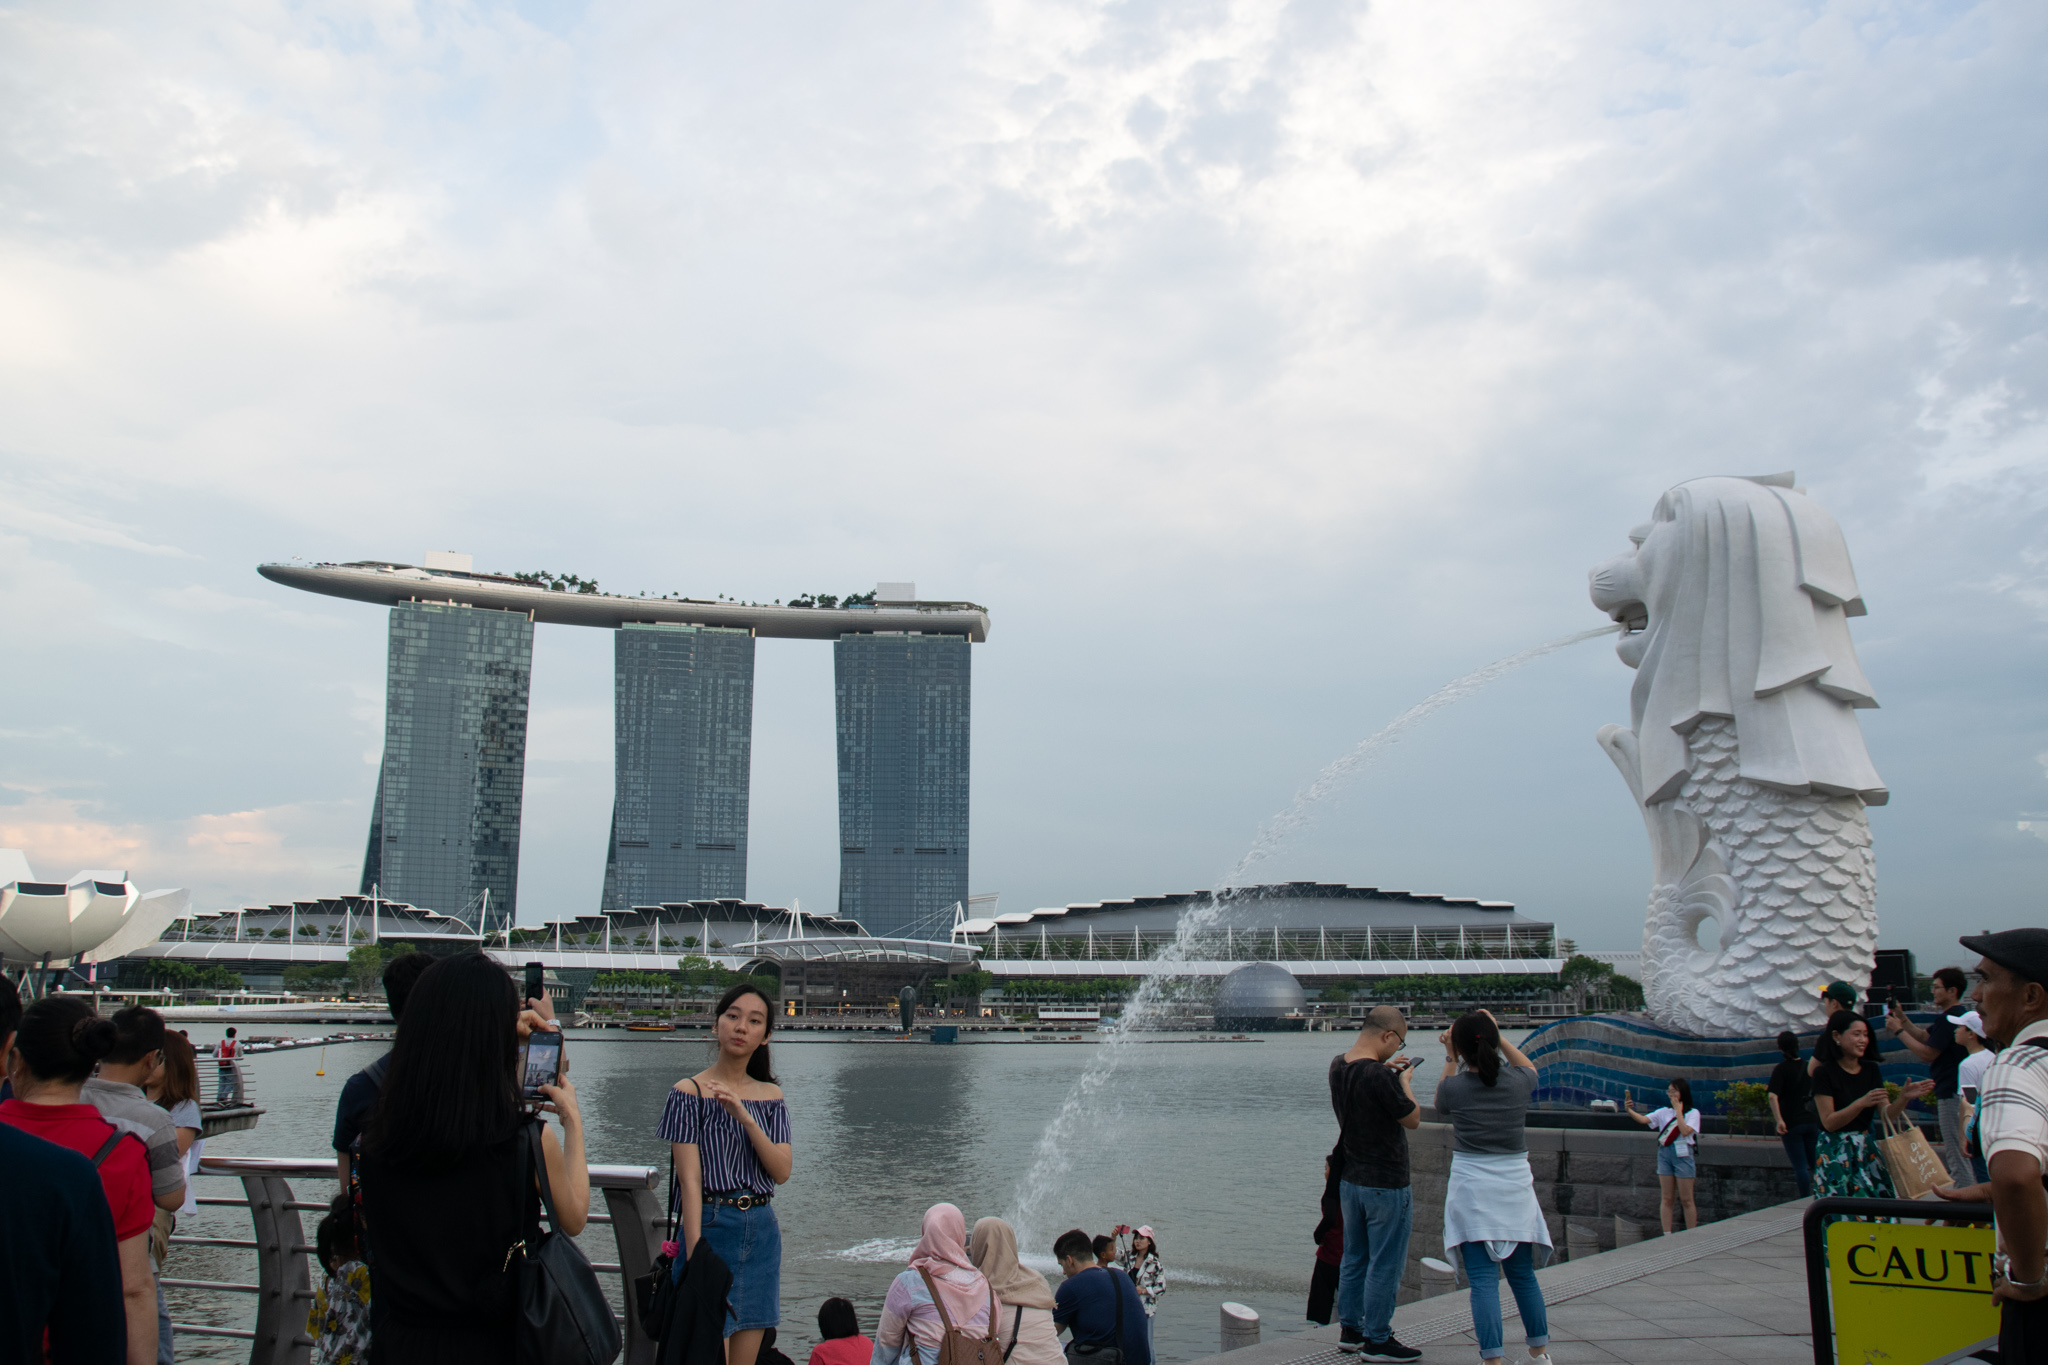
ところで、今回の問題はシンガポールで作っていたのですが、
あの「マリーナベイサンズ銀行」の預金ってどうやったら下ろせるんですかね。
by the way, could you tell me how to withdraw the money at “Marina Bay Sands Bank” if you know.
I think it’s the same way to get points in CTF, but it was very difficult for me….
especially slots….
ではでは! Bye!